Wind Turbine Tower Trends
by Paul Gipe
An edited version of this article appeared in WindStats Vol 8 No 1, (1st Quarter 1995) Portions of this article were adapted from Wind Energy Comes of Age Copyright 1995 by John Wiley & Sons. All rights reserved. "Jay Carter was right. There's wind up there," said one wag about the industry-wide trend toward tall towers. Jay Carter Jr. was the first to install medium sized wind turbines on towers taller than 30 meters. His 160-foot (49-meter) towers are a prominent, if jarring, feature of the landscape in California's San Gorgonio Pass where they look down upon a seething mass of 1000 turbines atop once commonplace 24 meter towers. But the shift is most apparent in Denmark (see accompanying table) and in Germany.
Winkra's revealing market survey shows all major European manufacturers offer 40 meter towers at a minimum. The German wind company's annual price list of products on the German market now shows that Bonus, Carter, Nordex, Nordtank, Nedwind, Tacke, Vestas, WindWorld, and WindMaster offer towers up to 50 meters in height. The fierce competition in the German market has led some manufacturers to stretch their tower designs slightly to gain an edge. Vestas offers a 53 meter tower, for example, while Enercon, long the height leader, advertises the availability of a 65 meter tower.
Tower Height
Zond's Finn Hansen says 60 meter towers may make sense in the interior of Germany or in forested belts of Northern Europe but he hasn't seen a need for them in North America yet. Still, much of the sales sizzle in the National Renewable Energy Laboratory's advanced wind turbine program is based on the promise tall towers offer. NREL, a U.S. government laboratory, attributes nearly half of the expected 50% improvement in wind turbine production from their research program to towers twice the height of those common in the late 1980s.
NREL's advanced wind turbine program assumes that hub heights increase from 90 feet (27 meters), considered the base case, to 180 feet (55 meters) with only a 10% cost penalty. The tall tower is justified if there's a high wind shear, such as NREL believes exists on the American Great Plains. With wind shear approximating the 1/7 power law, doubling tower height will increase the power available in the wind 45%. NREL's research, says Sue Hock, has found wind shear greater than the 1/7 power law.
Minnesota, currently a hotbed of wind activity, will be the first region on the Great Plains to test the merits of tall towers in North America. Minnesota's Department of Public Service is seeking funding for a series of tall anemometry towers to measure the wind shear up to 60 meters above ground level at several sites in the state specifically to evaluate the production benefits of taller towers.
There are less benefits from tall towers in Britain, suggests Andrew Garrad, where there's stronger winds at 40 meters than on the American Great Plains. In some cases, such as National Windpower's Bryn Titli site in Wales, there's planning pressure for shorter towers to reduce the obtrusiveness of the turbines. The Bonus 500 kW turbines at Bryn Titli were installed on 35 meter towers rather than the 40 meter towers that have become the norm.
NREL's Hock says that turbines and towers need to be tailored to individual sites, and tower height is part of the equation in North America as well. Bob Lynette agrees. The choice of towers, he says, is site dependent. Lynette is testing a prototype of his Advanced Wind Turbine on a 140-foot (43-meter) guyed tubular tower on Tehachapi's Cameron Ridge. Lynette's AWT-26, a redesign of the ESI-80 undertaken as part of NREL's advanced wind turbine program (from which its name was derived), lends itself to tall towers, says Lynette. Guyed pole towers are an economical means for reaching the heights NREL envisions.
Zond offers a 40 meter tower as standard with its new Z-40 turbine and provides a 50 meter tower as an option. Hansen notes that towers of other heights could be used in response to specific site conditions. Trees or other obstructions and terrain could dictate taller towers. The choice, Hansen says, rests with the customer.
Tower height is not simply a question of better performance, says the Oregon Department of Energy's Don Bain. No question that "tall towers can make or break some installations," he says. But Bain wants to know how tall towers effect the cost of energy. He argues that "least cost optimization" could favor tall towers in low wind areas and shorter towers in high wind areas as suggested by Andrew Garrad in Britain. The optimum depends on tower configuration and its cost. Bain also notes that aesthetics will be an issue in some places. Tall towers are more visible than short towers. And though tubular towers are visible for great distances on the North American plains, Minnesotans prefer tubular towers for aesthetic reasons.
Aerodynamicist Woody Stoddard, also observes that tall towers are "a damn good idea--if you have an elevator." Lifts would make it easier for able-bodied technicians to quickly service the nacelle. Lifts would also enable the handicapped to service the machines says Stoddard. Zond's Hansen doubts today's turbines can economically justify elevators, especially in California where Hansen finds Cal-OSHA's safety regulations too costly. But the question could be re-examined, he says, as turbines grow to nearly one megawatt in size.
Another limitation to tower height is regulations requiring distinctive marking of structures considered navigational hazards for aircraft. Marking has no effect on performance but does magnify the intrusiveness of wind turbines on the landscape.
Obstruction Marking
The intent of obstruction marking is to make structures such as wind turbines more visible to aircraft. The flashing lights and red and white bands commonly seen on radio masts increase the contrast between the mast and its surroundings. Unfortunately this would also heighten the contrast between wind turbines and the sky, making them more visible not only to aircraft but to the public as well. Imagine the outcry from the Country Guardians if every wind turbine in Britain sported a flashing strobe light or from a Dutch landscape protection society if every wind turbine in the Netherlands were painted in such garish colors as the NedWinds off Medemblik.
Every country has such a requirement, though the actual limit varies. In the United States the Federal Aviation Administration regulations state that any objects exceeding an overall height of 200 feet (61 meters) above ground level "should normally be marked and/or lighted." In Germany the "Luftverkehrsgesetz" requires obstruction marking of structures more than 100 meters (328 feet) above ground level.
German manufacturer Enercon offers 40, 50, and 65 meter towers for their E-40 model. The maximum height of the E-40 on a 65 meter tower is 85 meters (tower height plus rotor radius), well below the German obstruction limit. Local authorities could still require navigation lights if the turbine was installed near an airport or a prominent flight path. The same limitation applies in the United States for towers below 200 feet. If the turbine and tower are deemed a navigational hazard, marking is required.
Enercon is moving toward a standard 50 meter tower height for the North American market. The resulting 70-meter height to the tip of the blade on their E-40 will put them well above the 200-foot limit in the United States. Like others who've examined the issue, Enercon's Mark Haller expects that it will be sufficient to light perimeters turbines of a multi-turbine array in the United States, or it may be adequate to only mark corner turbines. Though neither approach has been tested.
According to Subpart 20 of the FAA regulations "an FAA aeronautical study may reveal that the absence of marking and/or lighting will not impair aviation safety." On paper at least towers can exceed 200 feet in the United States without the need for lighting or painting if they pose no hazard to aircraft. If WindStat's call to the FAA western regional office in Los Angeles was any indication of what it will be like dealing with the federal bureaucracy in the United States, wind companies are in for tough sailing. "I just don't have time to discuss it," said the FAA's Bud Whitfield.
The only documented test of the FAA's response since Boeing's MOD-2 fiasco near Goldendale, Washington, which did require lights and painting, has been in New York state. There AWS Scientific filed notices with the FAA for Kenetech's demonstration project with Niagara Mohawk Power Co. in Denmark township. A turbine with a 130-foot tower was accepted, but lights were required on a hypothetical 33-meter turbine and 160-foot tower reaching a total height of 213 feet. Partly as result of that experience AWS's Bruce Bailey recommends towers at least 120-foot tall in New York state and believes towers up to 140 feet tall will be acceptable. But he suggests shying away from overall heights exceeding 200 feet because of FAA lighting requirements. Bailey also notes that exemptions are possible, but warns that exemptions may be difficult to obtain from an obstinate bureaucracy.
It was the FAA's 200-foot limit that dictated the height of Carter's original tall tower says NREL's Paul Migliore. Though he wanted to go even higher, Carter specifically chose the 160-foot tower height to avoid dealing with the FAA. Carter's 160-foot tower and his 23-meter turbine put him at just below the limit at 198 feet.
Migliore notes that the issue of navigational lighting has been avoided until now because no one wants to spend the time fighting the FAA unless they need a permit for a specific project. "It's just a matter of time," says Earl Davis of the Electric Power Research Institute, before this issue is raised. Like Carter earlier, the tower height of EPRI's 6 MW demonstration of Zond's new Z40 turbine in Texas was limited to 40 meters (130 feet) even though Zond has long experience using 140-foot towers. Zond's Hansen notes that he has installed lights on turbines in Sweden and Germany. But both sites were near airports where the precaution was warranted.
"The jury's still out," says Dan Juhl on the requirement for lights in the United States. "It depends on where you are." Juhl feels regulators in Midwestern states will be more accommodating than those in more densely populated regions of the country such as New York and California. After all wind turbines pose far less of a navigational hazard atop Minnesota's isolated Buffalo Ridge than they do in Israel's Golan Heights where ground-hugging flights by Israeli fighter bombers required Britain's Markham to candy-stripe their turbines. Nevertheless, Juhl says he doesn't believe there will be significant advantages from towers over 50 meters tall in the Midwest. The biggest limitation, he says, will be the large cranes necessary to install tall towers.
Lattice versus Tubular
In another contrast with the United States, Europeans have almost universally embraced tubular towers. While the trend toward taller towers in Britain is mixed, it has become clear that there's a planning presumption against lattice towers, because of their appearance says Andrew Garrad of Garrad Hassan partners.
There's also a clear preference for tubular towers among landowners in Minnesota, says John Dunlop, the American Wind Energy Association's Great Plain representative. Technicians familiar with the upper Midwest's frigid winters also favor tubular towers for the protection the towers provide from the wind.
Skip DeLong of Southwestern Technical College in Jackson, Minnesota, says he "definitely prefers tubular towers" for maintenance in cold climates such as that of the upper Midwest. Like Stoddard, DeLong argues that wind turbines need to be "maintenance friendly and the tower is certainly a part of that" equation. DeLong worries that it may be difficult to do any service work on lattice towers in sub-zero (Fahrenheit) weather.
"We always recommend tubular towers" even in the United States, says Vestas American's Oscar Holst Jensen. They do, says Jensen, for safety in cold climates, for better security (tubular towers have a lockable door), and for aesthetics. "They (the turbines) look much better on tubular towers," says Jensen. "But," he adds, "we give the customer the choice." Mirroring Southwestern Technical College's DeLong, Jensen argues that turbines on lattice towers will have lower availability in the Midwest than those on tubular towers. "It's a tricky business to climb a lattice tower in the winter in Minnesota."
But the profit margins are so small in the North American market, says Jensen, that there's a lot of pressure to use lattice towers. For example, nearly all of Zond and Kenetech's turbines in California use lattice towers. Between them they produce a third of California's total wind generation. In Europe the planning pressure for tubular towers is so great that it's nearly impossible to use lattice towers except in Spain, and even there the trend is toward tubular towers.
According to Vestas' Jensen, a tubular tower for a 500 kW V39 costs about $25,000 more than that for a lattice tower in the United States. The difference is only 4-5% of installed equipment costs. This compares well with the experience of Zond's Hansen. The truss tower and its foundation for Zond's first prototype of its Z-40 accounts for 15% of installed costs. The tubular tower and foundation for Zond's second prototype, says Zond's Hansen, accounts for 20-25% of installed cost.
But lattice towers are more costly and difficult to assemble than tubular towers Jensen continues. Lattice towers require torquing 400-500 bolts, a small crane, and a lay-down yard or staging area for assembly. Complex terrain can complicate if not thwart use of lattice towers because of the need to transport lattice tower sections from the assembly yard to the final site. The transport of huge assembled lattice tower sections is a hair-raising experience and risky task.
Kenetech, the sole U.S. turbine manufacturer with machines in the field, offers towers in two heights: 80 (25 meters) and 120 feet (37 meters). Like Zond Systems, Kenetech clearly prefers lattice towers because they are initially cheaper. But they will bow to local preferences and use tubular towers for their projects in Britain and the Netherlands as they did for Northern States Power in Minnesota. Kenetech is widely credited with successfully developing an aesthetically pleasing tubular tower for NSP's 25 MW project on Buffalo Ridge.
Kenetech will also use tubular towers to meet demands from wildlife agencies some of whom believe that lattice towers contribute to killing birds in the Altamont Pass. Kenetech's tubular towers were hardly in the ground in Minnesota when Kenetech announced that they planned to replace their lattice towers with their ungainly "Kenetower." The only advantage the Kenetower offers to traditional tubular towers, such as that used on the NSP project, is less costly foundations. By spreading the tower's legs over a wider footprint than that of a conventional tubular tower, the Kenetower requires less excavation and less concrete for its footings. But the resulting appearance of the tower may be too high a price to pay for lower-cost footings. Referring to the Kenetower's rocket-like shape, one wind pioneer caustically says it "would probably make it to the moon." He also notes that the open base of the tower provides only limited shelter to windsmiths during the winter.
Crane Size
"There are logistics problems" with bigger machines says Bob Lynette. The bigger turbines, those in the 400-600 kW range, are more difficult to transport and install, he says. Turbines have become so big that installation on 40 meter towers in California requires 160-ton, rigid-boom cranes. These cranes are costly and difficult to maneuver in rough terrain. A crane operator was electrocuted in the Tehachapi Pass when the boom on his crane inadvertently swung into power lines while he was driving on a winding wind farm road. These large cranes could become a limiting factor on turbine size and tower height.
The lightweight nacelle of AWT-26 lends itself to tall towers, says Advanced Wind Turbine's Bob Lynette. The AWT-26 only needs a 100-ton crane. "There's a place for smaller machines," says Lynette in reference to the AWT's 26 meter rotor, especially in Third World countries without large cranes.
Lynette offers towers up to 140 feet and a choice between a conventional lattice tower and a guyed tubular tower. There's a negligible difference in cost between the two tower types, says Lynette. But the tower alone of a "walk up" tubular tower like those used by other manufacturers, costs twice as much as AWT's guyed tower with its external ladder.
The greater footprint of guyed tubular towers relative to conventional tubular and lattice towers may make them less desirable to farmers and ranchers who will have to dodge them with their tractors. The problem is not unlike that faced a decade ago by Carter with his slender guyed tower. Landowners may demand higher royalties to compensate for their trouble. It's conceivable that higher land leases for guyed tubular towers could offset their lower initial costs, boosting long-term operating costs.
This and other questions about optimum tower design and height await conclusive answers. In the meantime everyone agrees that Jay Carter Jr. was right, but how right remains to be seen.
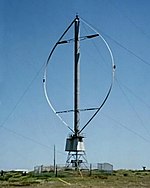 Vertical-axis wind turbines
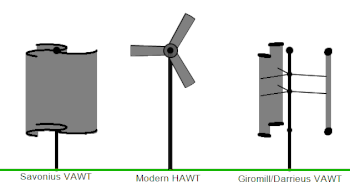 With a vertical axis, the generator and gearbox can be placed near the ground, using a direct drive from the rotor assembly to the ground-based gearbox, hence improving accessibility for maintenance.
 A subtype of Darrieus turbine with straight, as opposed to curved, blades. The cycloturbine variety has variable pitch to reduce the torque pulsation and is self-starting.[18] The advantages of variable pitch are: high starting torque; a wide, relatively flat torque curve; a lower blade speed ratio; a higher coefficient of performance; more efficient operation in turbulent winds; and a lower blade speed ratio which lowers blade bending stresses. Straight, V, or curved blades may be used.[citation needed]


 and the minimum is found for
  , where
 [3]
[3] is the tip speed ratio parameter.


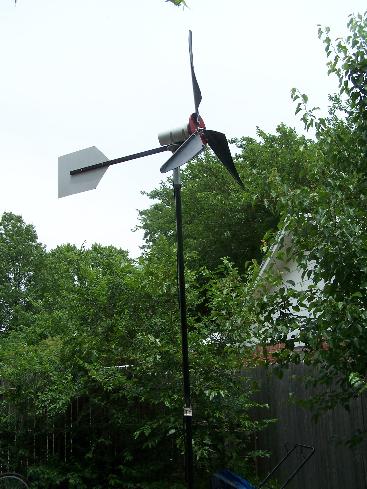
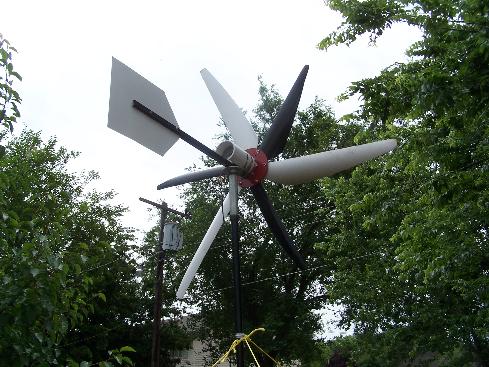
 But what if you have enough open land that deciding to build your own wind turbine on a tower? According to The Owner's Guide to Energy Independence Alternative Power Sources for the Average American, most homeowners who have installed residential wind turbines have placed their generators on towers at least in height. Principles of physics dictate that speed at which air moves decreases as it is closer to the ground, with the greatest increase in speed occurring between ground level and sixty feet.


